What is the best camera for your church or house of worship

What is the best Camera for Church?

What is the best camera for your church or house of worship?

What is the best camera for your church or house of worship? The fact of the matter is, the answer isn’t that simple. It has a lot to do with your set up within your sanctuary. So the best camera for your church is going to depend upon several factors.

In almost all cases PTZ cameras are advised. With the power of PTZ (Pan, Tilt, and Zoom) you effectively get a lot of virtual cameras. That is the same camera can focus on many different aspects of your service within vision of the camera. Since the Jimcom PTZ cameras allow over 200 set points, with a single click of a mouse or push of a button, they camera focus moves to a new visual target.  These targets might include; the podium, choir director, choir, soloist, organ, band, special guests, seated guests, etc. Since this PTZ control is fully automatic, no one needs to sit near the camera and the camera doesn’t need to be physically located for someone to readjust its focus.

When producing a live broadcast it’s usually advisable to have a minimum of two cameras available. This is so that one camera can be the live broadcast and the other camera can be moved through the PTZ mechanism or a PTZ joystick to find a new visual target for broadcast. The same really goes for prerecorded services as this eases the production process. In some cases, it might be nice to have a third camera pointed back at the parishioners or guests. If this is a PTZ camera as well, you will get the greatest flexibility as to be able to zoom in on certain individuals or to pan out to larger groups. Depending upon the size of your sanctuary and the architectural considerations there may be fixed objects that may interfere with certain views from cameras. In this case additional cameras may be needed to be able to see around those objects and view all aspects of the service.

Now those are some of the considerations when choosing the amount and location of cameras but the next part is really around the technology of the camera. There are numerous types of technologies for PTZ cameras; HDMI, NDI, SDI, USB, and standard IP-based cameras. To select the proper camera technology for your solution, you need to consider the equipment that is broadcasting or recording the service.

For low-cost solutions, Jimcom USA recommends using an NDI based
solution. This would be best for new installations, certainly if SDI or HDMI
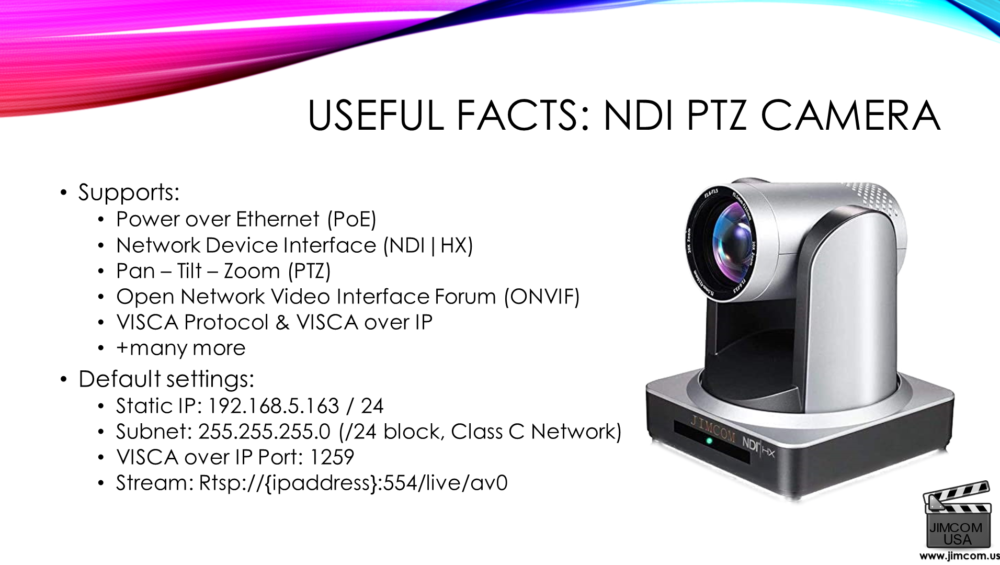
cabling were already run to the camera mount locations this would simplify installation. With the new install, NDI technology only needs CAT5/6 LAN cable run to the location the camera where it will be mounted. Most NDI cameras, such as the Jimcom NDI series, support Power-Over-Ethernet (PoE) meaning that the mount location of the camera does not need an AC power outlet. This reduces the cost of installation as you don’t need an electrician to run an outlet to where the camera will be mounted power can be provided over the low voltage cabling directly to the camera. 

With the low latency for the NDI technology synchronization of audio and video will be easy at the broadcast location/platform. Jimcom USA recommends the use of OBS Studio as a broadcast platform. This tool is free for use and supports the NDI protocol for very professional broadcasts at a very low cost. We recommend upgrading older technology to the newer NDI technology due to its cost benefits, quality, and ability to scale at a later time.

Synchronization of audio and video can be the most complicated aspect of setting up a broadcast or recording for your services. We recommend that you don’t use standard IP-based cameras because of the latency inherent in the transmission of the video signal. If you have a single camera this technology may suit and a very low cost but once you add more than one camera to your production equipment synchronization is almost impossible as timing drift will occur independent of each camera. Audio and video timing delays can be added with OBS but only if those timings are fixed.

So, to answer the question, “What is the best camera for my church?” Jimcom USA would recommend the NDI PTZ 20X or 30X Camera series for the most flexibility. These cameras offer the most flexibility and most of them support older technologies such as the SDI and HDMI outputs. These cameras also support VISCA as well as ONVIF for remote control of the PTZ camera system.

Control PTZ Camera within OBS

Add PTZ Controls Dock To OBS Studio | PTZ Control for OBS | Great PTZ Hack

Add PTZ Controls Dock into OBS Studio | PTZ Control for OBS | Great PTZ Hack

Add PTZ Controls Dock To OBS Studio! In this short video, we will cover how to add PTZ Controls Dock to your OBS Studio set up. The PTZ Controls Dock will support any number of cameras and allows setting and recalling of presets as well as manual control of the PTZ features of your Jimcom PTZ Camera.

This plugin uses VISCA-over-IP to control the camera connected to your local area network. A serial cable is also supported but not covered in this video.

Tip URL to all of OBS Studio’s Resources:
https://obsproject.com/forum/resources/

The PTZ Controls Plugin:
https://obsproject.com/forum/resources/ptz-controls.1284/

The PTZ Controls Download Link:
https://obsproject.com/forum/resources/ptz-controls.1284/download

Remember that your Jimcom PTZ 20X optical zoom camera will use Port 1259 for VISCA-over-IP, please make sure you use this port value during set up.

UPDATE: If you have recent Firmware update for the NDI PTZ Camera, please use the recommended UDP Port 52381 during set up.

The Camera used in this video was the Jimcom NDI PTZ 20X Optical Zoom Camera:
https://www.jimcom.us/product/jimcom-ndi-camera-20x/

Jimcom Affiliate Program Promo

Affiliate Program (New, Awesome Program) – Jimcom USA

Affiliate Program

Play Video

For more information and to apply:

Jimcom USA has just release the best #affiliate program offering its Affiliate program to help #Influencers and VLOGGERS around the world to help monetize their content. The program is not limited to just live streaming or content providers as websites focusing upon products, tools, and techniques of #livestreaming, #broadcasting, and/or #professional recording.


Program Advantages:

  • 90 Day Referral period
  • Generous commissions than most on High Tech products
  • Lifetime Commissions
  • Big Ticket Items; Live Streaming Products
  • Newer products being added
  • Products for high end consumer
  • Cost Conscious Business appeal
  • Coupons (Public and Private to Influencers Audience)


Make money with professional streaming/recording products. Use our program to supplement your streaming income or other affiliate programs. We have designed this program to better support you for the effort and content you put into your works.

OBS NDI Set up for beginners

OBS NDI Set-Up for Beginners

OBS NDI Set-Up for Beginners

Default OBS Installation location for ZIP file installation:

C:\Program Files\obs-studio


NDI Tools Download link: https://www.ndi.tv/tools/#download-tools OBS NDI PlugIn

https://obsproject.com/forum/resources/obs-ndi-newtek-ndi%E2%84%A2-integration-into-obs-studio.528/


OBS-ndi 4.9.x download location (Use above link to find the lastest version):

https://github.com/Palakis/obs-ndi/releases/tag/4.9.1

OBS NDI Set-Up

Adding NDI Support to OBS Studio will give you many more capabilities with your broadcast. This includes using low latency NDI Cameras as well as sharing screen captured content between multiple PC/MAC computers.

Please refer to the video on the left for complete instructions for the installation process. The links below will help you find the required downloads needed to get NDI functional on your computer. This process only has to be done once and can be done at your leisure.

NDI Tools – NDI.tv site – You will need to request the download link which NDI will email to you after your request. You will then need to install those tools. Mac & PC are supported by the NDI Tools.

To get the NDI Input Source for OBS Studio, you will need to install a plug-in. Download that plug-in and install to enable that capability. You will need to restart OBS Studio after installing the NDI PlugIn

Jimcom USA TRAINING VIDEO - Initial Configuration

NDI PTZ Camera Initial Configuration – Jimcom PTZ Cameras Training

NDI PTZ Camera Initial Configuration - Jimcom PTZ Cameras Training

Play Video

====================================================
Video Index

0:00 Introduction
0:47 Before You Get started
3:11 Find your local IP and Network Address
4:10 Configuration with PC DHCP IP Address
7:11 Configuration with PC Static IP Address
10:11 Outro

====================================================

This training is provided for customers of Jimcom NDI PTZ Cameras to set-up their cameras with their initial configuration. This is a beginner’s guide to will help town meeting, town council, selectmen meeting, churches, events, broadcast centers, educational webinar, business webinar, and other live streaming / recording studios up and running quickly.

This video covers initial setup of the following NDI|HX PTZ Cameras from Jimcom.us: https://www.jimcom.us/product/jimcom-ndi-ptz-camera-30x/ https://www.jimcom.us/product/jimcom-ndi-camera-20x/

NDI is recommended for new installations and for future growth. It offers some significant advantages which can be reviewed here.

LAN Plug

History of NDI – Network Device Interface

NDI was publicly found out by way of NewTek on 8 September 2015 and changed into demonstrated on the IBC broadcast exhibition in Amsterdam that week. The first tool shown the usage of NDI become the NewTek TriCaster which added an NDI feed from each of its SDI inputs as well as 4 output feeds from its vision mixer. The TriCaster can also get hold of up to two NDI resources from other gadgets (multiplied to twelve in later releases and up to 44 in NewTek’s IP Series ).

NDI devices from other providers followed at some stage in 2016. The first 0.33-party products got here from Gallery Sienna and blanketed an NDI signal generator for macOS, a computing device scan converter for macOS and the NDICam digital camera app for iPhone which supplies a native NDI circulation from iOS devices.

NewTek had previously created a predecessor of NDI known as AirSend to get video from external devices into their TriCaster merchandise. AirSend have been applied via a number of man or woman generator (CG) companies which include Vizrt and Chyron. In order to fast convey these merchandise into the NDI area, NewTek created a new driving force to replace the prevailing AirSend driver, which may be hooked up on these current AirSend compatible devices, instantly converting them to NDI like minded gadgets without a exchange required by means of the authentic CG vendors.

Another early adopter of NDI changed into VMix, a Windows-primarily based imaginative and prescient mixer which gives NDI inputs and outputs. A significant boom within the NDI hooked up base came whilst live streaming utility XSplit delivered assist for NDI.

Later in 2016, NewTek brought NDI 2.0 which delivered functions such as assist for carrier discovery throughout subnets. In April, Magewell introduced seamless integration of their PCIe and USB seize devices, allowing get right of entry to to any video source on the community. This answer created one of the most green broadcast video manufacturing scenarios possible with unlimited source preference and ubiquitous running device compatibility.

On 12 July 2017 NewTek announced NDI 3.0 which added multicast, NDI other new functions, introducing assist for precise PTZ Cameras with H.264 chipsets and up to date firmware.

In April 2018 at the NAB Show, Microsoft introduced that they had introduced NDI help to Skype for Content Creators. Other announcements at NAB2018 blanketed NDI 3.5, and new NDI guide from carriers along with EVS and Avid.

Version three.4 of FFmpeg delivered enter and output help for NDI whilst optionally compiled with the aid of the end-person to a non-open-source NewTek library. However, NewTek became later discovered to be redistributing pre-compiled binaries of FFmpeg that included their non-opensource library in violation of the GNU General Public License, inflicting the FFmpeg mission to eliminate NDI assist from their codebase in March 2019.

In April 2019, ahead of NAB, NewTek introduced the addition of Multi-TCP mode to NDI 4.0 which is pronounced to leverage hardware TCP acceleration present in silicon, helping lower-spec processors with NDI transport. NDI 4.0 shipped in September 2019 to coincide with the IBC exhibition.

OBS RTSP Set up

RTSP Set-up for OBS Studio

RTSP Set-up

How to add your Jimcom IP / NDI Camera to OBS as a RTSP stream?

Within the Camera’s Web Interface, select:
Configuration -> Video Configure -> Video Encode

Configure the Main/Sub Stream the way you wish. Then note the “Stream Name” at the bottom, default is “live/av0” & “live/av1” respectively.

In OBS, select the scene you wish to add the RTSP source. Click the “+” in sources and Add a “Media Source“. Give the source a good name and click “OK“.

Add Media Source - OBS

Unselect “Local File” so “Input” shows. Enter the rtsp url in the following format:
rtsp://{IPADDRESS}:554/live/av[0|1]

In this example, the Main Stream is selected:

rtsp://192.168.0.179:554/live/av0

You should check “Use hardware decode when available” if you have a GPU in the PC, always safer to check this for performance.

Select “OK” and the source will be added to your scene.

Jimcom Video Encoding Configuration
Jimcom OBS Add Media Source RTSP Setting

Thats a RTSP Stream source.

OBS Studio Help / Tools

The Elgato Stream Deck is a powerful tool that greatly enhances the functionality of OBS Studio, a free popular streaming software. One of the key features of the Stream Deck is its ability to have customizable buttons that can be assigned to control various functions in OBS Studio. This allows streamers to have quick and easy access different features, saving them time and effort.

By assigning specific actions to individual buttons on the Stream Deck, streamers can seamlessly switch between scenes, making their stream more dynamic and visually appealing. For example, they can have one button dedicated to transitioning to their starting scene, another button for transitioning to their gameplay scene, and so on. This simplifies the process and ensures smooth scene transitions, enhancing the overall production value of the stream.

In addition to scene transitions, the Stream Deck can also be used to manage audio levels during the stream. Streamers can assign buttons to adjust microphone input levels or control desktop audio, allowing them to easily manage audio levels without having to navigate through different menus in OBS Studio. This eliminates the need for additional hardware or software, streamlining the audio management process.

Moreover, the Stream Deck’s integration with OBS Studio also enables streamers to control their camera settings. They can assign buttons to switch between different cameras or adjust camera settings such as focus, zoom, or exposure. This flexibility allows streamers to easily make adjustments during their live stream, improving the overall visual quality and professionalism of their content.

The synergy between the Elgato Stream Deck and OBS Studio has greatly improved the efficiency and professionalism of streamers. With just a touch of a button, they can switch between different scenes, adjust audio levels, and operate OBS Studio seamlessly. This allows for better multitasking during live streams as streamers can focus on engaging with their audience rather than getting caught up in technical aspects.

This integration has not only improved the workflow of streamers but also enhanced the overall streaming experience for both content creators and viewers. Streamers can now provide a more polished and engaging stream, while viewers can enjoy a stream that is free from disruptions or technical glitches. The Stream Deck’s customizable buttons have granted streamers more control over their OBS Studio functions, allowing them to deliver high-quality content with ease.

We are an Amazon Affiliate and might receive a small compensation from your purchase. We have no other formal relationship with Amazon.

OBS Sound & Audio set-up with Microphone and audio sources

Ultimate Microphone Guide for OBS Studio

OBS Microphone/Audio Setup

Ultimate Microphone Guide – Want to get the help of an Audio expert to get the perfect sound on your live stream with OBS Studio?

Try this video and setup your audio sound like it was setup by a Pro Audio Engineer. This is a simple set of instructions to get awesome audio from your free OBS set-up.

This professional sound is achieved by up to 5 OBS built in audio filters. The default settings are all that are needed with the exception of the “GAIN”.  They should be placed in this order:

  1. Noise Gate (Optional)
  2. Noise Suppression
  3. Compressor
  4. Gain (need to tweak to maximize audio level)
  5. Limiter


This Video is Critical for your audio quality.